
Showing posts with label Dessert. Show all posts
Showing posts with label Dessert. Show all posts
Friday, August 8, 2025
No Need To Ask Why...Sheet Pie!
Wednesday, July 2, 2025
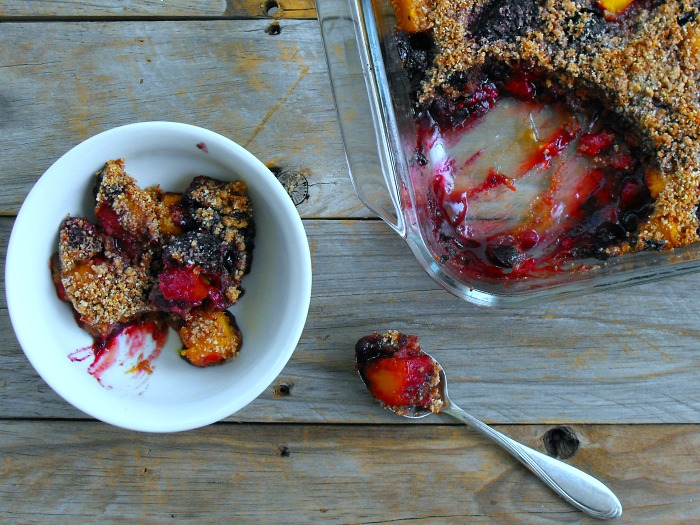
No Need For a Fork!

These are very simple desserts to be sure, but oh are they good! Renato Poliafito, who wrote the new cookbook Dolci, stopped by Tonia's Kitchen to talk about a chapter in the book, simply called Spoon. The reason for that, says Renato, every dessert in this chapter can be eaten with only a spoon. One recipe in particular, he told Tonia, is incredibly easy to make, having consisted of corn starch and cream. Renato told Tonia it's an old child's dessert from Italy that can easily be modified with other ingredients to make it your own. That's not the only recipe though, and Renato says there's so many delicious ideas in this chapter that can be explored!
Thursday, May 15, 2025
What's For Dessert? Tomatoes!

Yes, you can have tomatoes for dessert. Cherry tomatoes, prepared essentially as you do with candied apples. Natalie Keng, who wrote the new cookbook Egg Rolls and Sweet Tea, stopped by Tonia's Kitchen to discuss her Candied Tomato Bites. Natalie told Tonia this is street food in its essence. We all know that cherry tomatoes are already sweet to begin with, and now Natalie told Tonia, you can take that sweet essence and bring it up a notch, using both corn syrup and molasses. Both of those ingredients really work with the cherry tomato to make it a wonderful, wholesome dessert bite!
The Kids Are Going to Love This One...

....and the adults will too! Melissa Johnson, who wrote the new cookbook Celebrating Everyday, 100 Easy Recipes to Make Any Day Feel Special, stopped by Tonia's Kitchen to talk about her delicious Ice Cream Sandwich Cake recipe that the kids can help make. Melissa told Tonia all you do is take a casserole pan, layer ice cream sandwiches on the bottom, top with candy and Cool Whip and place another layer of sandwiches on top. Then just freeze it. It's easy, delicious and most of all, fun!
- 24 Ice Cream Sandwiches
- Chocolate Syrup
- 2 Cups Mini M&M’s
- 16 oz. Container of Cool Whip
In a 9×13 pan, make a single layer of ice cream sandwiches on the bottom.
Spread 1/2 of the Cool Whip over the first layer.
Drizzle with chocolate syrup and sprinkle with M&M'S.
Add another layer of ice cream sandwiches.
Top with Cool Whip, chocolate syrup, and M&M'S.
Place in the freezer for 2-3 hours to set. Slice and serve immediately out of the freezer.
Friday, May 2, 2025
Your Newest Favorite Treat

It's called Cookie Butter. You might have seen it on the shelves at your local grocery store next to the Hazelnut or Peanut Butter. It's a very sweet treat that a lot of people are taking a likening to, especially new cookbook author Dina Deleasa Gonsar. She wrote At the Kitchen Sink, and stopped by Tonia's Kitchen to talk about her recipe for this delicious butter, which has all the trappings of a soon-to-be classic dessert!
Thursday, May 1, 2025
A Perfect Dessert for Summer

And that dessert is the Italian Trifle. And this one you don't have to bake. Dina Deleasa Gonsar, who wrote the new cookbook At the Kitchen Sink, stopped by Tonia's Kitchen to talk about this fresh, light recipe which she likens to a toasted almond ice cream treat. Now there's no ice cream here, but the dessert itself is cool, creamy and delicious. A perfect dessert for summer, but we already told you that!
5 cups of pound cake, cut into cubes (can be store bought)
2 cups raspberries
1 sprig of mint (optional)
1 teaspoon lemon zest (optional)
Ingredients for Limoncello Mascarpone
1 1/3 cup heavy whipping cream, chilled
1/2 cup confectioner’s sugar
4 cups Mascarpone Cheese
1/2 cup lemon juice, fresh
4 tablespoon limoncello
1/2 teaspoon vanilla extract
In a larger bowl combine the mascarpone and 1 cup of whipping cream, and confectioner’s sugar until smooth. You can do this by hand or by using a low-medium speed on a hand mixer. Then add in the lemon juice, limoncello, and vanilla extract. Mix until well combined.
02In a small bowl, whip together 1 ½ cup heavy whipping cream, and ½ cup confectioner’s sugar, until it forms stiff peaks, about 5 minutes. Then, gently fold in the whipped cream with the mascarpone until completely combined.
03Line a trifle bowl with a thin layer of the limoncello mascarpone. Around ¼ of a cup. Then add one layer of pound cake cubes, sprinkle 1 cup of raspberries over top. Then add a layer of limoncello mascarpone.
04Repeat the process once more, pound cake, cup of berries, limoncello mascarpone.
05Make the whipped cream for the topping by combining 1 ½ cup whipping cream, ½ cup powdered sugar, and 1 tsp of vanilla. Whip on a medium low speed until it thickens and peaks start to form. About 5 minutes.
06Top the trifle with the homemade whipped cream and garnish with mint and lemon zest if desired.
07* Note: For best results use a metal bowl that has been chilled when making the whipped cream. *
Thursday, April 10, 2025
A Dessert From North of the Border

Today we head to the Canadian Province of Quebec, for a depression-era dessert that's a pudding, but also an upside down cake. Amy Traverso, who's the Senior Food Editor at Yankee Magazine and the host of Weekends with Yankee, seen on most PBS New England TV stations, stopped by Tonia's Kitchen to talk about a recipe called Pouding Chomeur, which is rough French for poor man's pudding. Amy told Tonia it's essentially two layers, one cake, one sauce. Both are delicious!
Ingredients
1 cup maple syrup (any grade)
1 cup heavy cream
½ teaspoon plus ½ teaspoon kosher salt
2/3 cup salted butter, softened, plus more for greasing ramekins
¾ cup granulated sugar
2 large eggs, at room temperature
1½ cups (210 grams) all-purpose flour
1½ teaspoons baking powder
1 teaspoon ground cardamom (optional)
½ cup milk
½ cup chopped walnut halves
Whipped cream, for garnish
Instructions
Preheat your oven to 350°F and set a rack to the middle position. Grease 8 ramekins with butter and arrange them on a rimmed baking sheet. Set aside.
First, make the sauce: Put the maple syrup, cream, and ½ teaspoon salt in a medium saucepan over medium-high heat. Bring to a boil, then remove from heat. Set aside ⅓ cup sauce in a small bowl. Divide the remaining sauce evenly among the 8 ramekins.
Next, make the dough: Using a stand or handheld mixer, beat the butter and sugar on high speed until fluffy, about 3 minutes, scraping down the sides of the bowl halfway through. Add the eggs, one at a time, beating well and scraping down the bowl after each.
In a medium bowl, whisk together the flour, baking powder, ½ teaspoon salt, and cardamom (if using). Add the dry ingredients to the wet and beat on low speed until blended. Scrape down the sides of the bowl. Add the milk and beat on low until evenly combined.
Divide the dough evenly among the prepared ramekins and transfer the baking sheet to the oven. Spread the chopped walnuts in a single layer on a small baking sheet or pan and put it in the oven. Toast the walnuts until golden brown, about 5 minutes, then remove. Bake the cakes until they are browned on top and puffed in the center, 20 to 25 minutes total. Let cool for 20 minutes. Serve warm with a dollop of whipped cream, a drizzle of the reserved sauce, and a sprinkle of toasted walnuts.
Monday, March 31, 2025
Try a Less Sweet Donut
.jpg)
This one comes to us from Southeast Asia, where most people there prefer their dessert on the less sweet side. Sarah Ahn, who wrote the new cookbook Umma, told Tonia's Kitchen about her recipe for Ooyoo Cream Doughnuts (Milk Cream Doughnuts). They're Korean in origin and Sarah says there's not much of a difference here between standard donuts and her creation, as they are still fried after baking. But the difference here is that instead of frosting, Sarah uses whipping cream and strawberries for the topping. And the cream itself is not heavy. Instead, it's airy and with just the right amount of sugar. But just because it's less sweet doesn't mean it's not a hit. Sarah told Tonia she put a platter of them at America's Test Kitchen in their break room. They didn't last long!
Thursday, January 2, 2025
A Creamy Dessert...That's Vegan!

It's not exactly the first thing you might think of when cooking vegan, but you can have creamy desserts without a drop of dairy! Nisha Vora, who wrote the new cookbook Big Vegan Flavor, came by Tonia's Kitchen with her recipe for Chai Spiced Custard Tart with Mango. Nisha told Tonia that while this dessert is inspired by the cuisine by her East Asian/Indian heritage, it is not as sweet as many of the authentic desserts you might find prepared in that tradition. To keep it vegan, Nisha uses coconut cream, vegan butter and ground almond flour. It's an amazing symphony of flavor, dairy-free!
Tuesday, December 17, 2024
Press These Buttons...

 ...or eat them. Nutella Buttons that is. Dorie Greenspan, who wrote the cookbook Baking Chez Moi, stopped by Tonia's Kitchen to talk about her Nutella Buttons, and are they amazing! Dorie told Tonia she uses mini-muffin pans to make the buttons. She fills the pans with white cake batter, a dollop of Nutella, topped with more cake batter and dipped in chocolate. After baking, you'll find this button is one you don't want to push! Instead, you'll want to eat it!
4 large eggs, at room temperature
1 cup minus 1 tablespoon (95 grams) confectioners’ sugar, sifted
¾ cup (102 grams) all-purpose flour
¼ teaspoon baking powder
Pinch of fine sea salt
½ teaspoon pure vanilla extract
Drop of pure almond extract (optional)
¾ stick (6 tablespoons; 3 ounces; 85 grams) unsalted butter, melted
About ¼ cup (74 grams) Nutella or jam, at room temperature
Center a rack in the oven and preheat the oven to 350 degrees F. The buttons can be baked in mini muffin tins or in foil-and-paper mini muffin cups. If you’re using muffin tins, butter them or line with paper cups; if you’re using foil muffin cups, put them on a baking sheet.
Separate the eggs. Put the yolks in a small bowl and whisk them lightly, just to blend. Put the whites in the bowl of a stand mixer or in a large bowl.
Whisk the confectioners’ sugar, flour, baking powder and salt together in a large bowl. Add the yolks, vanilla extract and almond extract, if you’re using it, and beat energetically. Pour in the melted butter, stir to combine and then give the batter a vigorous beating.
If you’re working in a stand mixer, fit it with the whisk attachment; if not, use a hand mixer. Beat the whites until they hold firm peaks but are still glossy. Using a flexible spatula, stir about one quarter of the whites into the batter to loosen it, then gently fold in the remaining whites. (At this point, you can press a piece of plastic film against the surface of the batter and refrigerate it overnight, if you’d like.)
It’s hard to give exact measurements, because muffin tin sizes can vary, but the principle here is to put a small amount of batter, about 1 teaspoon, in the bottom of each mold or paper cup, add ½ teaspoon Nutella or jam, and then cover the Nutella with enough batter to fill the mold or paper cup just to the top. If you’re using mini muffin tins and have some unfilled molds, put a spoonful of water in each empty one (to help the buttons to bake evenly). If you have more batter than muffin tins, refrigerate the batter until you’re ready for it.
Bake for 15 to 18 minutes, or until the tops of the buttons are golden brown and springy to the touch and a toothpick stuck into the center of a button comes out clean. Remove the buttons from the muffin tins as soon as they come out of the oven; the buttons baked in cups can stay in their liners. Cool the buttons to room temperature on racks. If you have more batter, make sure that the muffins tins are cool before filling them with the remaining batter and Nutella.
Wednesday, October 16, 2024
A Creamy Vegan Dessert
It's not exactly the first thing you might think of when cooking vegan, but you can have creamy desserts without a drop of dairy! Nisha Vora, who wrote the new cookbook Big Vegan Flavor, came by Tonia's Kitchen with her recipe for Chai Spiced Custard Tart with Mango. Nisha told Tonia that while this dessert is inspired by the cuisine by her East Asian/Indian heritage, it is not as sweet as many of the authentic desserts you might find prepared in that tradition. To keep it vegan, Nisha uses coconut cream, vegan butter and ground almond flour. It's an amazing symphony of flavor, dairy-free!
Thursday, August 22, 2024
Tomatoes...Dessert Style
Yes, you can have tomatoes for dessert. Cherry tomatoes, prepared essentially as you do with candied apples. Natalie Keng, who wrote the new cookbook Egg Rolls and Sweet Tea, stopped by Tonia's Kitchen to discuss her Candied Tomato Bites. Natalie told Tonia this is street food in its essence. We all know that cherry tomatoes are already sweet to begin with, and now Natalie told Tonia, you can take that sweet essence and bring it up a notch, using both corn syrup and molasses. Both of those ingredients really work with the cherry tomato to make it a wonderful, wholesome dessert bite!
Friday, August 16, 2024
This'll Press Your Buttons
...or eat them. Nutella Buttons that is. Dorie Greenspan, who wrote the cookbook Baking Chez Moi, stopped by Tonia's Kitchen to talk about her Nutella Buttons, and are they amazing! Dorie told Tonia she uses mini-muffin pans to make the buttons. She fills the pans with white cake batter, a dollop of Nutella, topped with more cake batter and dipped in chocolate. After baking, you'll find this button is one you don't want to push! Instead, you'll want to eat it!4 large eggs, at room temperature
1 cup minus 1 tablespoon (95 grams) confectioners’ sugar, sifted
¾ cup (102 grams) all-purpose flour
¼ teaspoon baking powder
Pinch of fine sea salt
½ teaspoon pure vanilla extract
Drop of pure almond extract (optional)
¾ stick (6 tablespoons; 3 ounces; 85 grams) unsalted butter, melted
About ¼ cup (74 grams) Nutella or jam, at room temperature
Center a rack in the oven and preheat the oven to 350 degrees F. The buttons can be baked in mini muffin tins or in foil-and-paper mini muffin cups. If you’re using muffin tins, butter them or line with paper cups; if you’re using foil muffin cups, put them on a baking sheet.
Separate the eggs. Put the yolks in a small bowl and whisk them lightly, just to blend. Put the whites in the bowl of a stand mixer or in a large bowl.
Whisk the confectioners’ sugar, flour, baking powder and salt together in a large bowl. Add the yolks, vanilla extract and almond extract, if you’re using it, and beat energetically. Pour in the melted butter, stir to combine and then give the batter a vigorous beating.
If you’re working in a stand mixer, fit it with the whisk attachment; if not, use a hand mixer. Beat the whites until they hold firm peaks but are still glossy. Using a flexible spatula, stir about one quarter of the whites into the batter to loosen it, then gently fold in the remaining whites. (At this point, you can press a piece of plastic film against the surface of the batter and refrigerate it overnight, if you’d like.)
It’s hard to give exact measurements, because muffin tin sizes can vary, but the principle here is to put a small amount of batter, about 1 teaspoon, in the bottom of each mold or paper cup, add ½ teaspoon Nutella or jam, and then cover the Nutella with enough batter to fill the mold or paper cup just to the top. If you’re using mini muffin tins and have some unfilled molds, put a spoonful of water in each empty one (to help the buttons to bake evenly). If you have more batter than muffin tins, refrigerate the batter until you’re ready for it.
Bake for 15 to 18 minutes, or until the tops of the buttons are golden brown and springy to the touch and a toothpick stuck into the center of a button comes out clean. Remove the buttons from the muffin tins as soon as they come out of the oven; the buttons baked in cups can stay in their liners. Cool the buttons to room temperature on racks. If you have more batter, make sure that the muffins tins are cool before filling them with the remaining batter and Nutella.
Wednesday, August 14, 2024
Summer Cobbler

As you host those summer food parties, you might be looking for a way to feed a lot of people dessert. Pastry chef Paula Shoyer says there's an easy way to satisfy a lot of sweet teeth at once! She told Tonia's Kitchen to consider the fruit cobbler. Paula told Tonia that not only is it delicious, but it also feeds up to 20 people! She says the key to her recipe is to put the fruit compote on the bottom the pan, with the crust on top. Paula also says you might want to consider chickpea flour, which gives the cobbler a subtle nutty flavor.
- 8 cups mixed berried and fruit (I used blueberries, raspberries, strawberries and mangoes)
- ½ cup brown sugar (I used coconut palm sugar)
- 1 tsp ground ginger
- ¼ cup potato starch
- 2 tsp cinnamon
- ½ cup brown sugar, packed (I used coconut palm sugar)
- 1½ cups almond meal
- 1 Tbsp potato starch
- 5 Tbsp dairy free margarine (I used butter)

Instructions
- Place the fruit in a 9x13 pan.
- Combine the brown sugar, ginger and ¼ cup potato starch and toss with the fruit.
- In another bowl, mix together the cinnamon, brown sugar, almond meal, potato starch and margarine until crumbly.
- Sprinkle the almond mixture over the fruit.
- Bake in a preheated 375 degree oven for 40 minutes or until the fruit is bubbly.
- Let cool from hot to warm before eating.
- This is really good served with vanilla ice cream
Tuesday, July 9, 2024
A Dessert You Can Eat with a Spoon
These are very simple desserts to be sure, but oh are they good! Renato Poliafito, who wrote the new cookbook Dolci, stopped by Tonia's Kitchen to talk about a chapter in the book, simply called Spoon. The reason for that, says Renato, every dessert in this chapter can be eaten with only a spoon. One recipe in particular, he told Tonia, is incredibly easy to make, having consisted of corn starch and cream. Renato told Tonia it's an old child's dessert from Italy that can easily be modified with other ingredients to make it your own. That's not the only recipe though, and Renato says there's so many delicious ideas in this chapter that can be explored!
Friday, June 14, 2024
Similiar to a Strawberry Syrup

You'll be amazed at what you can do with this Strawberry recipe. For example, it could also be used as a drink livener-upper or as a dessert topping, or in a number of other uses. Nancie McDermott, who wrote the new cookbook Fruit, came by Tonia's Kitchen to talk about her recipe for Strawberry Shrub. Admittedly, it's an interesting name, but the result will give you something pretty special. Nancie told Tonia, like as before, you can use either fresh or frozen strawberries to make this and note it will take a few days to finish. But as Nancie noted, it's worth it!
- 3 cups apple cider vinegar
- 3 cups trimmed and quartered fresh or frozen strawberries
- 3 cups sugar

- Prepare a large glass jar with a tight-fitting lid as directed in “How to Sterilize Jars for Storing Jams and Preserves in the Refrigerator." In a medium saucepan, heat the vinegar until it is just about to break into a bubbling boil and remove it from the heat. Place the strawberries in the prepared jar and pour the vinegar over them, making sure they are covered by an inch of vinegar. Let cool to room temperature and then cover tightly. Set aside in a cool, dark place for 24–48 hours (be sure the jar is not exposed to heat or light). Strain the vinegar into a medium saucepan and discard the solids. Add the sugar to the vinegar and bring to a rolling boil, stirring to dissolve the sugar. As soon as the sugar is dissolved, remove the pan from the heat and let the shrub cool to room temperature. Pour the shrub into a clean, sterilized jar and cover tightly. Store in the refrigerator for up to 6 months.

Monday, June 3, 2024
Don't Fear This Dessert

You shouldn't fear it, because if you follow the recipe it will turn out amazing! Debbie Wilson Berment, who wrote the new cookbook The Sagajo Experience, stopped by Tonia's Kitchen to talk about her Pavolva recipe, basically creme and berries. Debbie told Tonia there are a lot of people who afraid to make it because they're worried it won't turn out right. But the good news here is that Debbie has included a lot of details in her recipe that if you follow them, you can't go wrong. Debbie says it's a delicious cloud of goodness just waiting to make your dessert table great.
Wednesday, May 1, 2024
Don't Be Afraid of This Dessert Recipe
You shouldn't fear it, because if you follow the recipe it will turn out amazing! Debbie Wilson Berment, who wrote the new cookbook The Sagajo Experience, stopped by Tonia's Kitchen to talk about her Pavolva recipe, basically creme and berries. Debbie told Tonia there are a lot of people who afraid to make it because they're worried it won't turn out right. But the good news here is that Debbie has included a lot of details in her recipe that if you follow them, you can't go wrong. Debbie says it's a delicious cloud of goodness just waiting to make your dessert table great.
Wednesday, January 31, 2024
A Brownie You Can Really Feel Good About

The reason you'll feel good about eating these brownies is because they're based on the avocado. Yes, we said avocado. The last thing you might think of when considering making brownies, right? Well, read on, because Kat Ashmore, who wrote the new cookbook, Big Bites, stopped by Tonia's Kitchen to talk about her recipe for these "special" brownies that get most of their fat from avocado, along with the structure. She says these delicious snack cakes won't spike your blood sugar, or leave you hungry in a hour. Oh, and by the way, they're delicious!

Wednesday, January 10, 2024
A Lemon of a Dessert


And we don't mean that in a bad way! This one's a light, creamy dessert that doesn't require an oven. Abbie Dodge, who wrote the cookbook The Everyday Baker, came by Tonia's Kitchen to talk about her no-bake Lemon-Ginger Mousse Souffle. It uses a gelatin base, and ricotta cheese, both of which help keep it deliciously light! Try it out and have fun.
For the mousse:
- 3⁄4 cup freshly squeezed lemon juice
- 1 envelope unflavored powdered gelatin
- 1 1⁄4 cups ricotta (part skim is fine)
- 3⁄4 cup granulated sugar
- 1 Tbs. finely grated lemon zest
- 2 tsp. finely grated fresh ginger
- Pinch of table salt 4 whites from large eggs at room temperature
- 1⁄2 tsp. cream of tartar
- 1⁄2 cup confectioners’ sugar, sifted if lumpy
- 12 gingersnap cookies + more for the crushed cookie topping (I use Nabisco or homemade molasses cookies)
MAKE AHEAD
The soufflés can be prepared, covered, and refrigerated for up to 2 days before serving. Have ready six 6-oz. ramekins arranged on a flat plate or quarter sheet pan. Cut parchment into six strips 2.5 inches wide and 12 inches long. Wrap one strip around each ramekin so that the paper covers the ramekin and stands 1 inch above the rim; secure with tape. Lightly grease the inside of the paper rim (I use a paper towel dipped in a bit of neutral oil).
Instructions
Make the mousse
- Pour the lemon juice into a small heatproof ramekin (or keep it in the measuring cup) and sprinkle the gelatin evenly over the top. Set aside to soften. Once the gelatin has absorbed the liquid and is plump (about 3 minutes), microwave briefly until it is completely melted and crystal clear, 1 to 2 minutes. This can also be done in a small saucepan (instead of the ramekin) over low heat.
- Put the ricotta, granulated sugar, lemon zest, ginger, and salt in a blender. Scrape the lemon gelatin mixture into the blender, cover, and process until the ricotta is smooth and the mixture is well blended, about 1.5 minutes, scraping down the sides once or twice. Pour into a medium bowl and refrigerate, stirring frequently, until the mixture is cooled and thickened, 20 to 30 minutes. It should be as thick as unbeaten egg whites. For faster cooling, set the bowl over a larger bowl filled with ice, stirring and scraping the sides frequently until cooled.
- Put the egg whites and cream of tartar in the bowl of a stand mixer fitted with the whisk attachment (or in a medium bowl and using an electric handheld mixer fitted with wire beaters) and beat on medium speed until the whites are frothy, 30 to 45 seconds. Increase the speed to medium high and beat until the whites form soft peaks, 1 to 2 minutes. Continue beating while gradually adding the confectioners’ sugar, stopping occasionally to scrape down the sides of the bowl. Beat until the whites form firm and glossy peaks when the beater is lifted.
- Scoop about one-quarter of the whites into the thickened lemon mixture and, using a silicone spatula, gently stir until blended. Add the remaining whites and gently fold in until just blended.
Assemble the mousses
- Arrange one cookie in the bottom of each ramekin.
- Using a large spoon, fill the ramekins halfway with the mousse.
- Arrange a cookie on top of the mousse and evenly portion the remaining mousse on top of the cookies. Using a small offset spatula, smooth the tops.
- Cover loosely with plastic wrap and refrigerate until firm, at least 6 hours or up to 1 day.
To serve
Using a sharp paring knife, carefully peel away the parchment from the ramekins (up to 3 hours ahead). Just before serving, place each ramekin on a small plate and top with some of the crushed ginger cookie or a little of the blackberry compote, passing the remainder at the table.
Blackberry Compote
Ingredients
- 2 cups blackberries, rinsed and well dried
- 2 to 3 Tbs. limoncello liqueur
- 2 Tbs. granulated sugar
- 1 tsp. finely grated lemon zest
Instructions
- Put the blackberries, limoncello, sugar, and lemon zest in a medium bowl.
- Toss with a silicone spatula, lightly crushing the berries to release some of their juices.
- Cover and refrigerate until ready to use or for up to 6 hours.
Subscribe to:
Posts (Atom)